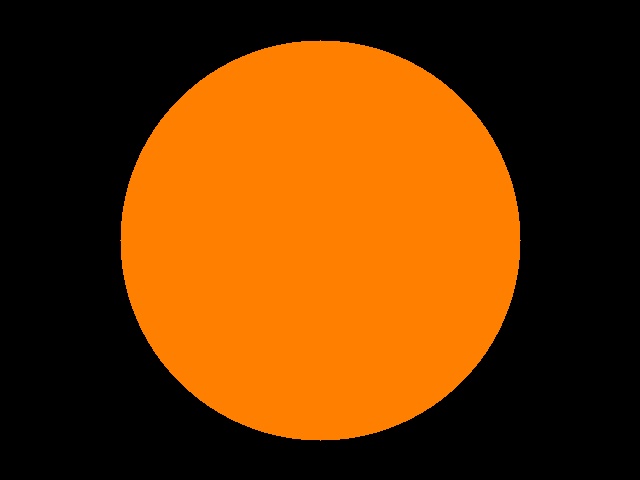
OpenCV programming introduction. Python. Example source codes for media art.
Make image and output file.
# -*- coding: utf-8 -*-
import numpy as np
import cv2
def main():
image = np.zeros((480, 640, 3), dtype=np.uint8)
cv2.circle(image, (320,240), 200, (0,127,255), -1)
cv2.imwrite('image.jpg', image)
if __name__ == '__main__':
main()

image = np.zeros((480, 640, 3), dtype=np.uint8)
[np] OpenCV image is represented by numpy matrix.
[zeros] Make zero matrix.
[(480,640,3),dtype=np.uint8] 480 rows, 640 columns, 3 channels, 8 bit,
unsigned, integer, image.
cv2.circle(image, (320,240), 200, (0,127,255), -1)
[circle] Draw circle. See web pages for more information.
[(0,127,255)] OpenCV use BGR not RGB.
cv2.imwrite('image.jpg', image)
[imwrite] Image output.
If you cannot output file, check the basic information. Unwritable disk, directory cannot be accessed by non-administrator, file currently using, invalid file name, disk broken, too long file name, file size is zero, file size is over 2GB, disk space non-available, bug in your program, file/directory name including non-ASCII characters, file/directory name including space, etc.
For example, 'image.jpg' is meaning which directory? The directory same as the source code? The default working directory set by the developement environment? The directory currently looking at in the development environment? Or?
Vertical size first and horizontal size second in np.zeros like (480,640,3), while horizontal position first and vertical postion second in circle like (320,240). Pixel position representation is different for each function, so please be careful. Which is first: Vertical/row/y/height or horizontal/column/x/width?
[Python]
As is shown in "image = np.zeros((480, 640, 3), dtype=np.uint8)",
the variable "image" can be used without defining. You don't
need to specify the data type.
One operation in one line, and you need not to add ";" as C-language.
Like "(480,640,3)", comma represents a tuple.
Data type rarely appears in Python code, but you need to be careful about
data type. Like "np.uint8", you often need to specify data type.
Be careful to data type when implementation.
Like "dtype=np.uint8", you can specify argument even for skippable
argument. You can skip the in-between arguments.
File output of camera image.
# -*- coding: utf-8 -*-
import cv2
def main():
capture = cv2.VideoCapture(0)
_, image = capture.read()
cv2.imwrite('image.jpg', image)
if __name__ == '__main__':
main()
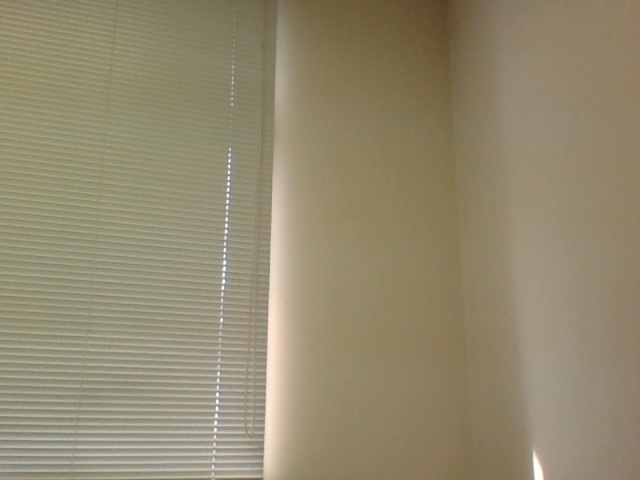
cv2.VideoCapture(0)
[0] Camera number which is 0 or more integer.
_, image = capture.read()
[image] Second return value is the camera image.
Integer number starting from 0 is assigned to each camera. Try 0, and if
not working, try 1, ....
Even if you connect one camera, the identifying number is not always 0.
Virtual camera may exists, thus, the number of camera OS recognized in
not always the same as the physical camera connected.
"It did work with 0 before" --> Number may change.
If every camera do not work. Bug in your program. Camera unrecognized by OS. Camera device driver halted. Uncommon camera unsupported by OpenCV. Lens cap covered. Other software is using the camera (Even if the camera image is not shown, the software may open the camera inside the software). Camera is currently initializing, and need to wait or need to capture several frames. Camera unsupported in your development enveronment. Other reason.
[Python]
"_, frame = capture.read()" return value of "read"
is pair (2-element tuple). Tuple can be unpacked to multiple values. Unneeded
value is often written as "_".
Show camera image on the window.
# -*- coding: utf-8 -*-
import cv2
def main():
capture = cv2.VideoCapture(1)
while True:
_, frame =
capture.read()
cv2.imshow('My OpenCV Program', frame)
if
cv2.waitKey(1) & 0xFF == 0x1B:
break
cv2.destroyAllWindows()
if __name__ == '__main__':
main()
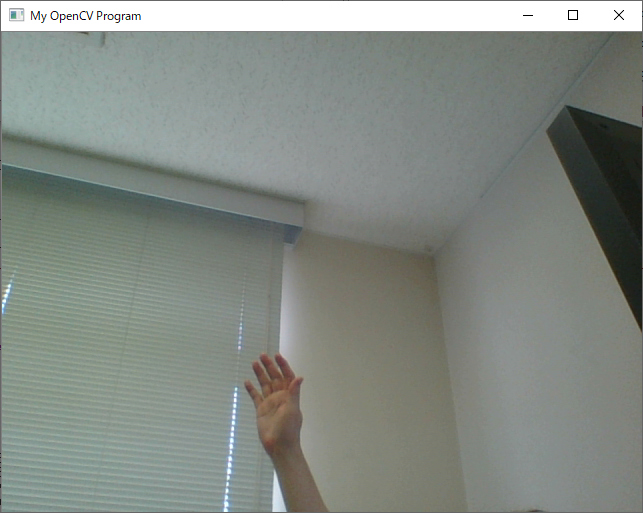
cv2.imshow('My OpenCV Program', frame)
[imshow] Show image using "imshow".
if cv2.waitKey(1) & 0xFF == 0x1B:
[waitKey] If 1 is set to "waitKey", wait 1 millisecond, return
keycode if keyboard tapped, continue the program if keyboard not tapped.
This program quits if ESC tapped.
cv2.destroyAllWindows()
[destroyAllWindows] Close window.
Call "destroyAllWindows" to close window. Always call "destroyAllWindows" at the end of the program: Some programming language or some development enviroment automatically close all windows at the end of the program, but some not.
[Python]
Effective range of "while" is represented by indent. Indent is
the part of Python program. Do not indent freely like C-language.
Write sentences on the camera image.
# -*- coding: utf-8 -*-
import numpy as np
import cv2
def main():
capture = cv2.VideoCapture(1)
if not capture.isOpened():
print('Cannot open camera')
return
numberframe = 0
start = cv2.getTickCount()
while True:
numberframe
+= 1
end =
cv2.getTickCount()
numbertime
= np.floor((end - start) / cv2.getTickFrequency())
ret, frame
= capture.read()
if ret:
message = 'Frame %d' % numberframe
cv2.putText(frame, message, (100, 100), cv2.FONT_HERSHEY_SIMPLEX, 2, (0, 0, 0),
2)
message = 'Time %d' % numbertime
cv2.putText(frame, message, (100, 200), cv2.FONT_HERSHEY_SIMPLEX, 2, (0, 0, 0),
2)
cv2.imshow('My OpenCV Program', frame)
key =
cv2.waitKey(1) & 0xFF
if key ==
0x1B:
break
if key ==
ord(' '):
cv2.imwrite('screenshot.jpg', frame)
capture.release()
cv2.destroyAllWindows()
if __name__ == '__main__':
main()
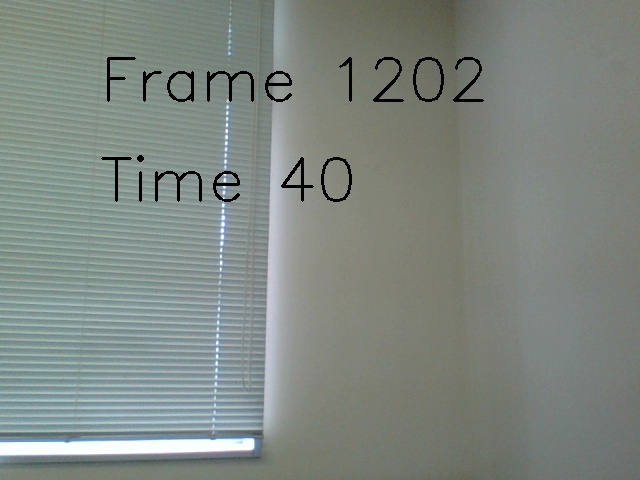
if not capture.isOpened():
Check whether the camera is successfully opened.
ret, frame = capture.read()
if ret:
Check whether the camera image is successfully obtained.
capture.release()
Close camera after use.
cv2.putText(frame, message, (100, 100), cv2.FONT_HERSHEY_SIMPLEX, 2, (0, 0,
0), 2)
"putText" writes words.
[Python]
Use "+=1" for adding 1 instead of incremental operator "++"
used in C-language.
Implement as "message = 'Frame %d' % numberframe" in Python instead
of "sprintf" in C-language.
"ord" converts "str" to ASCII code.
Read and show image file.
# -*- coding: utf-8 -*-
import cv2
def main():
input = cv2.imread('image.jpg')
cv2.imshow('My OpenCV Program',
input)
cv2.waitKey(0)
cv2.destroyAllWindows()
if __name__ == '__main__':
main()
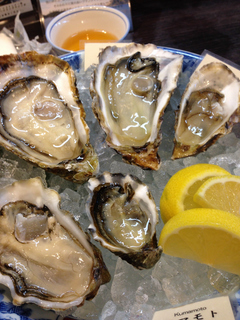
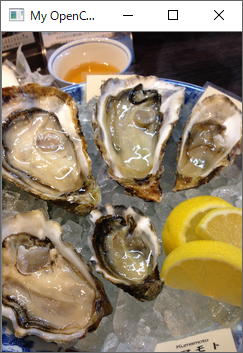
cv2.waitKey(0)
If 0 is set to "waitKey", wait untile keyboard tapped. Program
continues after keyboard tapped. This program quits after keyboard tapped.
If you cannot input file, check the basic information. No file, unintended file, file size is 0, file size is over 2GB, file corrupted, file in use, file name is wrong, program bug, file/directory name including non-ASCII characters, file/directory name including space, etc.
For example, 'image.jpg' is meaning which directory? The directory same as the source code? The default working directory set by the developement environment? The directory currently looking at in the development environment? Or?
Paste image on image (synthesize, embed, overlay).
# -*- coding: utf-8 -*-
import numpy as np
import cv2
def main():
bgimg =
cv2.imread('background.jpg')
fgimg =
cv2.imread('foreground.jpg')
mat = np.array([[0.5, 0.0, 300.0],
[0.0, 0.5, 300.0]], dtype=np.float32)
rows, cols, ch = bgimg.shape
cv2.warpAffine(fgimg, mat, (cols,
rows), bgimg, borderMode=cv2.BORDER_TRANSPARENT)
cv2.imshow('My OpenCV Program',
bgimg)
cv2.waitKey(0)
cv2.destroyAllWindows()
if __name__ == '__main__':
main()
![]() foreground.jpg
foreground.jpg
![]() background.jpg
background.jpg
![]()
When pasting image, copying array often faces invalid memory access, so be careful for the outside region of the image. "warpAffine" allows to paste image even if the image is pasted outside the image. In addition to the pasting position, rotation and scaling are also possible.
np.array([[0.5, 0.0, 300.0], [0.0, 0.5, 300.0]], dtype=np.float32)
This example is an affine transform matrix with 2 rows 3 colums, where
the scaling is 0.5 and the position of lefttop is (300,300).
rows, cols, ch = bgimg.shape
"shape" returns matrix size. For image, vertical pixel length,
horizontal pixel length, and number of channels are obtained.
Paste RGBA PNG image on image (synthesize, embed, overlay).
# -*- coding: utf-8 -*-
import numpy as np
import cv2
def main():
bgimg =
cv2.imread('background.jpg', cv2.IMREAD_COLOR)
fgimg =
cv2.imread('foreground.png', cv2.IMREAD_UNCHANGED)
bgb, bgg, bgr = cv2.split(bgimg)
fgb, fgg, fgr, fga =
cv2.split(fgimg)
rows, cols, ch = bgimg.shape
warpb = np.zeros((rows, cols),
np.uint8)
warpg = np.zeros((rows, cols),
np.uint8)
warpr = np.zeros((rows, cols),
np.uint8)
warpa = np.zeros((rows, cols),
np.uint8)
mat = np.array([[0.5, 0.0, 300.0],
[0.0, 0.5, 300.0]], dtype=np.float32)
cv2.warpAffine(fgb, mat, (cols,
rows), warpb, borderMode=cv2.BORDER_TRANSPARENT)
cv2.warpAffine(fgg, mat, (cols,
rows), warpg, borderMode=cv2.BORDER_TRANSPARENT)
cv2.warpAffine(fgr, mat, (cols,
rows), warpr, borderMode=cv2.BORDER_TRANSPARENT)
cv2.warpAffine(fga, mat, (cols,
rows), warpa, borderMode=cv2.BORDER_TRANSPARENT)
bgb = bgb / 255.0
bgg = bgg / 255.0
bgr = bgr / 255.0
warpb = warpb / 255.0
warpg = warpg / 255.0
warpr = warpr / 255.0
warpa = warpa / 255.0
bgb = (1.0 - warpa) * bgb + warpa *
warpb
bgg = (1.0 - warpa) * bgg + warpa *
warpg
bgr = (1.0 - warpa) * bgr + warpa *
warpr
result = cv2.merge((bgb, bgg, bgr))
cv2.imshow('My OpenCV Program',
result)
cv2.waitKey(0)
cv2.destroyAllWindows()
if __name__ == '__main__':
main()
![]() foreground.png
foreground.png
![]() background.jpg
background.jpg
![]()
Prepare png file with alpha channel.
bgimg = cv2.imread('background.jpg', cv2.IMREAD_COLOR)
fgimg = cv2.imread('foreground.png', cv2.IMREAD_UNCHANGED)
bgb, bgg, bgr = cv2.split(bgimg)
fgb, fgg, fgr, fga = cv2.split(fgimg)
"split" can split each channel.
result = cv2.merge((bgb, bgg, bgr))
"merge" can merge multiple channels.
rows, cols, ch = bgimg.shape
warpb = np.zeros((rows, cols), np.uint8)
warpg = np.zeros((rows, cols), np.uint8)
warpr = np.zeros((rows, cols), np.uint8)
warpa = np.zeros((rows, cols), np.uint8)
mat = np.array([[0.5, 0.0, 300.0], [0.0, 0.5, 300.0]], dtype=np.float32)
cv2.warpAffine(fgb, mat, (cols, rows), warpb, borderMode=cv2.BORDER_TRANSPARENT)
cv2.warpAffine(fgg, mat, (cols, rows), warpg, borderMode=cv2.BORDER_TRANSPARENT)
cv2.warpAffine(fgr, mat, (cols, rows), warpr, borderMode=cv2.BORDER_TRANSPARENT)
cv2.warpAffine(fga, mat, (cols, rows), warpa, borderMode=cv2.BORDER_TRANSPARENT)
Here, "warpAffine" is applied to each channel. Background is
black.
bgb = bgb / 255.0
bgg = bgg / 255.0
bgr = bgr / 255.0
warpb = warpb / 255.0
warpg = warpg / 255.0
warpr = warpr / 255.0
warpa = warpa / 255.0
Divide each channel by 255, to make real number 0-1. Although some sample
codes use bit-calculation for sprite calculation, this program calculates
by alpha blending.
bgb = (1.0 - warpa) * bgb + warpa * warpb
bgg = (1.0 - warpa) * bgg + warpa * warpg
bgr = (1.0 - warpa) * bgr + warpa * warpr
Alpha value is 0-1, and 0 is transparent and 1 is opaque for png file.
Formula is "(1-alpha)*background+alpha*foreground". If alpha
is 0, "(1-alpha)*background+alpha*foreground"=background. If
alpha is 1, "(1-alpha)*background+alpha*foreground"=foreground.
png's tranparent region becomes background, and png's opaque region becomes
png's image.
Segment foreground and background. Indicate foreground as red. Indicate background as blue.
# -*- coding: utf-8 -*-
import numpy as np
import cv2
def main():
inputImage = cv2.imread('image.bmp', cv2.IMREAD_COLOR)
inputMask = cv2.imread('mask.bmp', cv2.IMREAD_COLOR)
if inputImage is None:
return
if inputMask is None:
return
if inputImage.shape != inputMask.shape:
return
rows, cols, _ = inputImage.shape
strokeImage = inputImage.copy()
processMask = np.zeros((rows, cols), dtype=np.uint8)
regionImage = inputMask.copy()
compositeImage = inputImage.copy()
fgImage = inputImage.copy()
for y in range(0, rows):
for x in range(0, cols):
b,
g, r = inputMask[y, x]
if
r == 255 and g == 0 and b == 0:
processMask[y,
x] = cv2.GC_FGD
strokeImage[y,
x] = (0, 0, 255)
elif
r == 0 and g == 0 and b == 255:
processMask[y,
x] = cv2.GC_BGD
strokeImage[y,
x] = (255, 0, 0)
else:
processMask[y,
x] = [cv2.GC_PR_FGD, cv2.GC_PR_BGD][(x + y) % 2]
bgdModel = np.zeros((1,65), dtype=np.float64)
fgdModel = np.zeros((1,65), dtype=np.float64)
iterCount = 4
cv2.grabCut(inputImage, processMask, None, bgdModel,
fgdModel, iterCount, mode=cv2.GC_INIT_WITH_MASK)
for y in range(0, rows):
for x in range(0, cols):
compositeImage[y,
x] = compositeImage[y, x] / 2
category
= processMask[y, x]
if
category == cv2.GC_FGD or category == cv2.GC_PR_FGD:
regionImage[y,
x] = (0, 0, 255 if category == cv2.GC_FGD else 127)
compositeImage[y,
x] = compositeImage[y, x] + (0, 0, 128)
elif
category == cv2.GC_BGD or category == cv2.GC_PR_BGD:
regionImage[y,
x] = (255 if category == cv2.GC_BGD else 127, 0, 0)
compositeImage[y,
x] = compositeImage[y, x] + (128, 0, 0)
fgImage[y,
x] = (255, 255, 255)
cv2.imwrite('stroke.bmp', strokeImage)
cv2.imwrite('region.bmp', regionImage)
cv2.imwrite('composite.bmp', compositeImage)
cv2.imwrite('foreground.bmp', fgImage)
if __name__ == '__main__':
main()
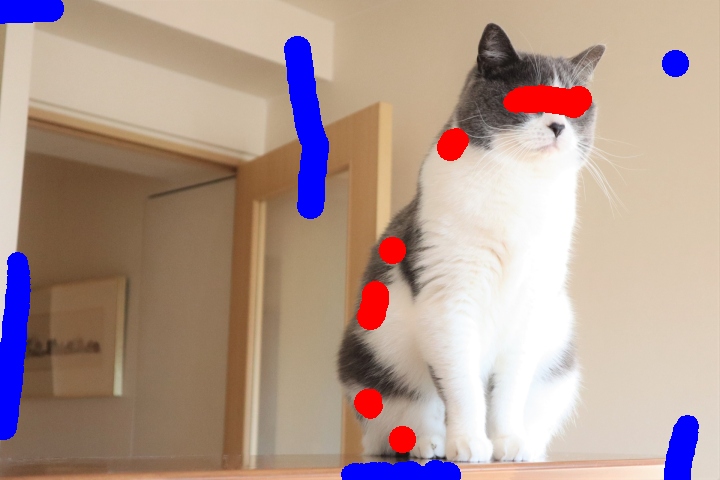
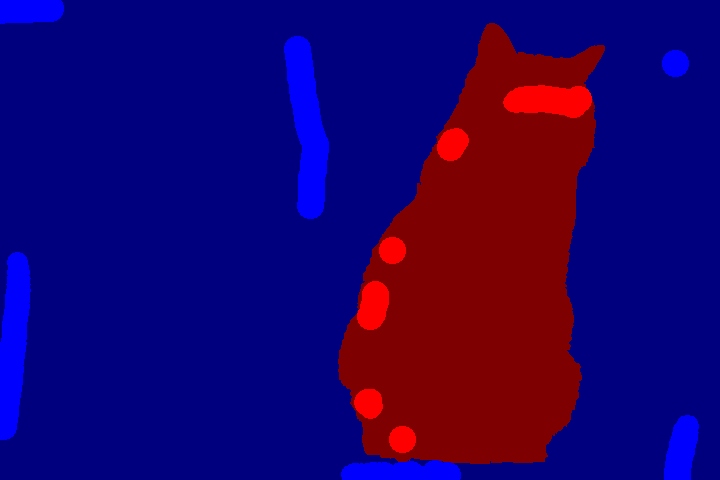
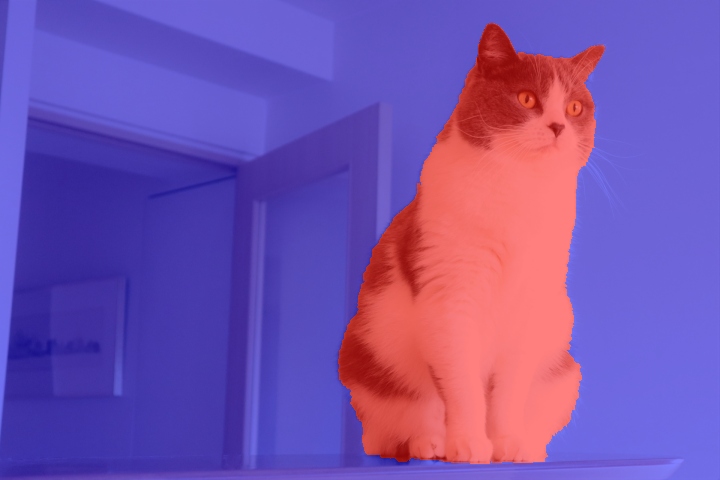
cv2.grabCut(img,mask,rect,bgdModel,fgdModel,iterCount,mode)
"iterCount" is iteration number. 1-10.
"bgdModel" and "fgdModel" is float64 with size (1,65).
Unused.
Set "GC_INIT_WITH_MASK" to "mode".
Set "None" to "rect".
For "mask", set numpy matrix with same size as "img"
with 8bit 1-channel.
"mask" is 1 of 4 below.
GC_BGD(value is 0) User suggested background pixel
GC_FGD(value is 1) User suggested foreground pixel
GC_PR_BGD(value is 2) Possible background pixel
GC_PR_FGD(value is 3) Possible foreground pixel
Note: Do not leave "mask" unchanged from initial value 0 (GC_BGD do not change from background)
Set "GC_FGD" or "GC_BGD" at user suggested pixels.
Set "GC_PR_FGD" or "GC_PR_BGD" for other pixels.
Region segmentation result of "grabCut" is represented as "GC_PR_FGD" or "GC_PR_BGD", overwritten.
[Python]
"if" statement inside a sentence (conditonal assigment "?:"
in C-language).
(true case) if (condition) else (false case)
[Python]
"b=a" by reference. If we change "b", "a"
is also changed.
"b=a.copy()" copy (clone). If we change "b", "a"
is not changed. numpy's copy is deep copy.
Detect face.
# -*- coding: utf-8 -*-
import cv2
def main():
cascade =
cv2.CascadeClassifier('C:\\Users\\Daisuke\\anaconda3\\Lib\\site-packages\\cv2\\data\\haarcascade_frontalface_default.xml')
image = cv2.imread('image.jpg')
faces =
cascade.detectMultiScale(image)
for x, y, w, h in faces:
cv2.rectangle(image, (x, y), (x + w, y + h), (0, 0, 255))
cv2.imshow('My OpenCV Program',
image)
cv2.waitKey(0)
cv2.destroyAllWindows()
if __name__ == '__main__':
main()

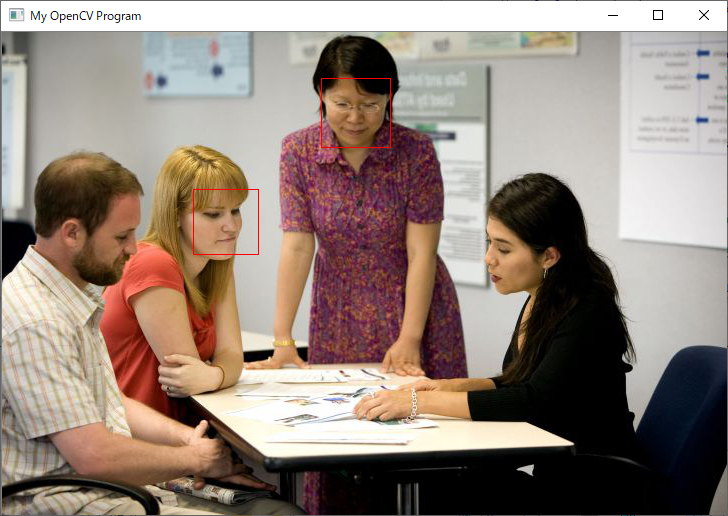
Viola-Jones (AdaBoost using Harr-like feature). OpenCV function, and trained model for face is also available.
cascade =
cv2.CascadeClassifier('C:\\Users\\Daisuke\\anaconda3\\Lib\\site-packages\\cv2\\data\\haarcascade_frontalface_default.xml')
Trained model is in the OpenCV directory. The directory depends on each
person's environment. Find the directory using file search or information
on the web. You can get the file on the web even if it is not found in
your machine. Some people provide training models other than faces on the
web, and try using them. If you train with your training data, you can
detect what you want.
faces = cascade.detectMultiScale(image)
for x, y, w, h in faces:
Return value of "detectMultiScale" is the face detection result.
Returned value is lefttop position (x,y) and width and height. Returned
value consists of all detected faces.
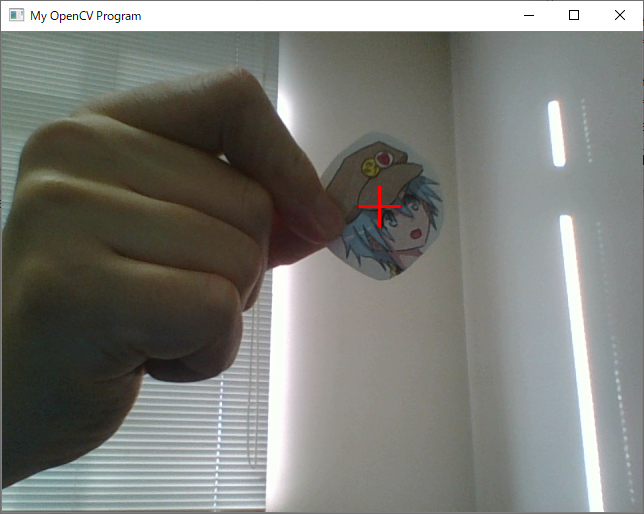
Detect object.
# -*- coding: utf-8 -*-
import numpy as np
import cv2
def main():
marker = cv2.imread('marker.jpg')
camera = cv2.imread('camera.jpg')
description =
cv2.xfeatures2d.SIFT_create()
kp1, des1 =
description.detectAndCompute(marker, None)
kp2, des2 =
description.detectAndCompute(camera, None)
bf = cv2.BFMatcher()
matches = bf.knnMatch(des1, des2,
k=2)
good = []
for m, n in matches:
if
m.distance < 0.7 * n.distance:
good.append(m)
src_pts = np.float32([
kp1[m.queryIdx].pt for m in good ]).reshape(-1,1,2)
dst_pts = np.float32([
kp2[m.trainIdx].pt for m in good ]).reshape(-1,1,2)
if len(good) > 10:
M, _ =
cv2.findHomography(src_pts, dst_pts, cv2.RANSAC, 5.0)
if M is not
None:
h, w, _ = marker.shape
pts = np.float32([ [w/2,h/2] ]).reshape(-1,1,2)
dst = cv2.perspectiveTransform(pts,M)
centerx = np.int32(dst[0][0][0])
centery = np.int32(dst[0][0][1])
cv2.line(camera, (centerx - 20, centery), (centerx + 20, centery), (0, 0, 255),
2)
cv2.line(camera, (centerx, centery - 20), (centerx, centery + 20), (0, 0, 255),
2)
cv2.imshow('My OpenCV Program',
camera)
cv2.waitKey(0)
cv2.destroyAllWindows()
if __name__ == '__main__':
main()
 marker.jpg
 camera.jpg
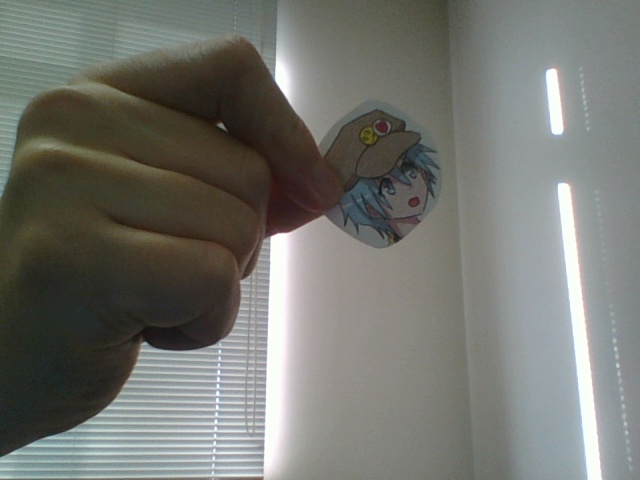
Complex textured object is easier to detect. Use the image actually captured by the camera as the template.
SIFT has the highest performance among ORB, AKAZE, BRISK, and others in OpenCV. KAZE is the second best choice.
Due to the licence matter, SIFT and SURF, depending on the OpenCV version, are not installed in default, or are in different directory, or are not in xfeatures2d. Refer to web's information to use SIFT. "pip install opencv-python" cannot use SIFT but "pip install opencv-contrib-python" can use SIFT.
According to web's information, SIFT's patent ended in 2020/3/6, SURF's patent is still alive in 2020.
description = cv2.xfeatures2d.SIFT_create()
"SIFT_create" initialize SIFT.
"cv2.SIFT_create()" instead depending on version.
kp1, des1 = description.detectAndCompute(marker, None)
kp2, des2 = description.detectAndCompute(camera, None)
"detectAndCompute" detects feature points. First returned value
"keypoint" is the detected point, and its "pt" has
its 2D coordinates. Second returned value "descriptor" is the
feature vector.
bf = cv2.BFMatcher()
matches = bf.knnMatch(des1, des2, k=2)
"BFMatcher"'s "knnMatch" cprresponds same feature points.
Faster k-nn is slower. Fast method's "search" is fast but "preprocessing"
is slow. Trees, tables, or graphs are constructed in preprocessing. Preprocessing
for each frame is slow. Fast method is suited for searching enormous times
without changing database. In fact, as for this program, FLANN's knnMatch
was 10 times slower than Brute Force's knnMatch.
matches = bf.knnMatch(des1, des2, k=2)
good = []
for m, n in matches:
if m.distance < 0.7 * n.distance:
good.append(m)
"knnMatch" returns matching result. Top 2 is obtained from knnMatch
with k=2.
"distance" is difference. How much 2 points' feature are different.
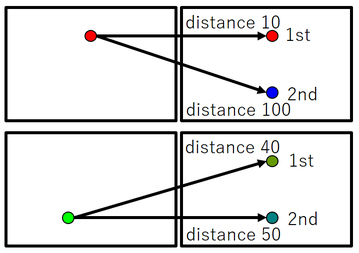
[Upper example] "10<0.7*100" holds. First pair are similar.
Second point is quite different from them. This feature point is unique
compared to other feature points.
--> This matching is reliable.
[Lower example] "40<0.7*50" does not hold. First pair are
not similar. Second point is similar to them. Many similar points, and
these points are similar to other points.
--> This matching is unreliable.
kp1, des1 = description.detectAndCompute(marker, None)
kp2, des2 = description.detectAndCompute(camera, None)
src_pts = np.float32([ kp1[m.queryIdx].pt for m in good ]).reshape(-1,1,2)
dst_pts = np.float32([ kp2[m.trainIdx].pt for m in good ]).reshape(-1,1,2)
"queryIdx" and "trainIdxIndex" is index which point
and which point matched. This index is "knnMatch"'s argument's
list's index, and "detectAndCompute" returned value's list's
index. "knnMatch"'s first argument's list's index is "queryIdx",
and second argument's list's index is "trainIdx".
if len(good) > 10:
If corresponding points are more than 10, let's assume that object detection
successed.
M, _ = cv2.findHomography(src_pts, dst_pts, cv2.RANSAC, 5.0)
"findHomography" calculate homograpy matrix between correponding
points.
dst = cv2.perspectiveTransform(pts,M)
"perspectiveTransform" transforms using homography.
This program transforms the center position of template. This program draw cross mark at the position transformed to camera image coordinates.
[Python]
[] is empty list. Add element by "append".
a=[]
a.append(1)
a.append(2)
a.append(3)
Here, "a" becomes [1,2,3].
[Python]
Python's for is range-based for (foreach).
a=[1,2,3]
b=0
for m in a:
b+=m
Here, "b" becomes 6.
[Python]
Python's list can contain for-statement. List comprehensions.
a=[1,2,4]
b=[1/m for m in a]
Here, "b" becomes [1.0,0.5,0.25].
[Python]
"reshape" modifies matrix shape.
import numpy as np
a=np.array([1,2,3,4,5,6])
b=a.reshape(2,3)
Here, "b" becomes numpy matrix [[1,2,3],[4,5,6]].
"reshape(-1,1,2)" means [][1][2] in C-language.
[Python]
Comparing with "None", use "is" instead of "==".
Object tracking. Put object inside red rectangle. Push space key. Draw red rectangle to the detected area of moved object.
# -*- coding: utf-8 -*-
import numpy as np
import cv2
def main():
tracker = cv2.TrackerKCF_create()
capture = cv2.VideoCapture(0)
while True:
_, camimg = capture.read()
camimg = cv2.flip(camimg,
1)
rows, cols, _ = camimg.shape
x1, x2, y1, y2 = cols /
2 - 50, cols/ 2 + 50, rows / 2 - 50, rows / 2 + 50
x1, x2, y1, y2 = int(x1),
int(x2), int(y1), int(y2)
cv2.rectangle(camimg, (x1
- 2, y1 - 2), (x2 + 2, y2 + 2), (0, 0, 255), 2)
message = 'Put object inside
and press space'
cv2.putText(camimg, message,
(50, 50), cv2.FONT_HERSHEY_SIMPLEX, 1, (0, 0, 0), 2)
cv2.imshow('My OpenCV Program',
camimg)
key = cv2.waitKey(1) &
0xFF
if key == ord(' '):
tracker.init(camimg,
(x1, y1, x2 - x1, y2 - y1))
break
while True:
_, camimg = capture.read()
camimg = cv2.flip(camimg,
1)
_, (x, y, w, h) = tracker.update(camimg)
cv2.rectangle(camimg, (x
- 2, y - 2), (x + w + 2, y + h + 2), (0, 0, 255), 2)
cv2.imshow('My OpenCV Program',
camimg)
key = cv2.waitKey(1) &
0xFF
if key == 0x1B:
break
capture.release()
cv2.destroyAllWindows()
if __name__ == '__main__':
main()
![]()
![]()
Recent OpenCV has better tracking algorithm than particle filter, condensation, MCMC.
Tracking is avaliable in opencv-contrib-python. Uninstall before install.
pip uninstall opencv-python
pip uninstall opencv-contrib-python
pip install opencv-python
pip install opencv-contrib-python
"cv2.TrackerKCF_create" creates.
"tracker.init" sets the region to begin tracking.
"tracker.update" gives the detected position.
Move blue circle paper, and touch red circle on the screen.
# -*- coding: utf-8 -*-
import numpy as np
import cv2
def main():
circler = 20
hit = True
capture = cv2.VideoCapture(0)
while True:
_, camimg =
capture.read()
camimg =
cv2.flip(camimg, 1)
rows, cols,
ch = camimg.shape
hsvimg =
cv2.cvtColor(camimg, cv2.COLOR_BGR2HSV)
cv2.imshow('Debug window: hsvimg', hsvimg)
binimg =
cv2.inRange(hsvimg, (90, 120, 50), (120, 250, 200))
cv2.imshow('Debug window: binimg', binimg)
playerx =
-10000
playery =
-10000
fillmax =
0.5
box1img =
binimg.copy()
box2img =
camimg.copy()
nlabels, _,
stats, centroids = cv2.connectedComponentsWithStats(binimg)
for i in
range(0, nlabels):
left = stats[i,cv2.CC_STAT_LEFT]
top = stats[i,cv2.CC_STAT_TOP]
width = stats[i,cv2.CC_STAT_WIDTH]
height = stats[i,cv2.CC_STAT_HEIGHT]
area = stats[i,cv2.CC_STAT_AREA]
centerx = np.int32(centroids[i,0])
centery = np.int32(centroids[i,1])
cv2.rectangle(box1img, (left, top), (left + width, top + height), 255)
cv2.rectangle(box2img, (left, top), (left + width, top + height), (0, 0, 255))
if area > 100 and area < 100000:
aspect = np.min((width, height)) / np.max((width, height))
if aspect > 0.7:
fill = area / (height * width)
if fill > fillmax:
playerx = centerx
playery = centery
fillmax = fill
cv2.line(box1img, (playerx - circler, playery), (playerx + circler, playery), 0,
2)
cv2.line(box1img, (playerx, playery - circler), (playerx, playery + circler), 0,
2)
cv2.imshow('Debug window: box1img', box1img)
cv2.line(box2img, (playerx - circler, playery), (playerx + circler, playery),
(0, 0, 0), 2)
cv2.line(box2img, (playerx, playery - circler), (playerx, playery + circler),
(0, 0, 0), 2)
cv2.imshow('Debug window: box2img', box2img)
cv2.line(camimg, (playerx - circler, playery), (playerx + circler, playery), (0,
0, 0), 2)
cv2.line(camimg, (playerx, playery - circler), (playerx, playery + circler), (0,
0, 0), 2)
if hit:
circlex = np.random.randint(circler, cols - 2 * circler)
circley = np.random.randint(circler, rows - 2 * circler)
cv2.circle(camimg, (circlex, circley), circler, (0, 0, 255), -1)
dist =
(playerx - circlex) ** 2 + (playery - circley) ** 2
if dist <
(2 * circler) ** 2:
hit = True
else:
hit = False
cv2.imshow('OpenCV Game', camimg)
key =
cv2.waitKey(1) & 0xFF
if key ==
0x1B:
break
if key ==
ord(' '):
cv2.imwrite('debug-hsvimg.jpg', hsvimg)
cv2.imwrite('debug-binimg.jpg', binimg)
cv2.imwrite('debug-box1img.jpg', box1img)
cv2.imwrite('debug-box2img.jpg', box2img)
cv2.imwrite('game.jpg', camimg)
cv2.destroyAllWindows()
if __name__ == '__main__':
main()
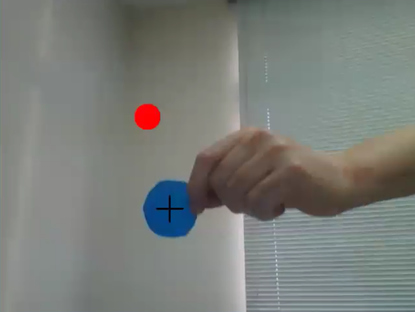
camimg = cv2.flip(camimg, 1)
"flip" flips left and right. Easy to move your hand if the shown
image moves in same direction as your hand.
hsvimg = cv2.cvtColor(camimg, cv2.COLOR_BGR2HSV)
"cvtColor" converts to HSV. The range of HSV value of OpenCV
can be found in the web.
binimg = cv2.inRange(hsvimg, (90, 120, 50), (120, 250, 200))
"inRange" extracts hue 90-120, saturation 120-250, and value
50-200. You have to tune these values when using this program in your environment.
nlabels, _, stats, centroids = cv2.connectedComponentsWithStats(binimg)
for i in range(0, nlabels):
Detect blue circle using binary image processing. I skip explaining because
it is not robust.
cv2.line(camimg, (playerx - circler, playery), (playerx + circler,
playery), (0, 0, 0), 2)
cv2.line(camimg, (playerx, playery - circler), (playerx, playery + circler), (0,
0, 0), 2)
Draw cross at detected blue circle.
if hit:
circlex = np.random.randint(circler, cols - 2 * circler)
circley = np.random.randint(circler, rows - 2 * circler)
If hit to red circle, randomly change poisiton of red circle.
cv2.circle(camimg, (circlex, circley), circler, (0, 0, 255), -1)
Draw red circle.
dist = (playerx - circlex) ** 2 + (playery - circley) ** 2
if dist < (2 * circler) ** 2:
hit = True
else:
hit = False
Collision happens if the distance between blue circle and red circle are
close.
key = cv2.waitKey(1) & 0xFF
if key == 0x1B:
break
if key == ord(' '):
cv2.imwrite('game.jpg', camimg)
ESC key quits the program. Space key outputs image file.
[Python]
"**" is power.
SIFT version of above program.
# -*- coding: utf-8 -*-
import numpy as np
import cv2
def main():
circler = 20
hit = True
marker = cv2.imread('marker.jpg')
marker = cv2.flip(marker, 1)
description =
cv2.xfeatures2d.SIFT_create()
kp1, des1 =
description.detectAndCompute(marker, None)
h, w, _ = marker.shape
capture = cv2.VideoCapture(0)
while True:
_, camimg =
capture.read()
camimg =
cv2.flip(camimg, 1)
rows, cols,
_ = camimg.shape
kp2, des2 =
description.detectAndCompute(camimg, None)
bf =
cv2.BFMatcher()
matches =
bf.knnMatch(des1, des2, k=2)
good = []
for m, n in
matches:
if m.distance < 0.7 * n.distance:
good.append(m)
src_pts =
np.float32([ kp1[m.queryIdx].pt for m in good ]).reshape(-1,1,2)
dst_pts =
np.float32([ kp2[m.trainIdx].pt for m in good ]).reshape(-1,1,2)
playerx =
-10000
playery =
-10000
if
len(good) > 10:
M, _ = cv2.findHomography(src_pts, dst_pts, cv2.RANSAC, 5.0)
if M is not None:
pts = np.float32([ [w/2,h/2] ]).reshape(-1,1,2)
dst = cv2.perspectiveTransform(pts,M)
playerx = np.int32(dst[0][0][0])
playery = np.int32(dst[0][0][1])
cv2.line(camimg, (playerx - circler, playery), (playerx + circler, playery), (0,
0, 0), 2)
cv2.line(camimg, (playerx, playery - circler), (playerx, playery + circler), (0,
0, 0), 2)
if hit:
circlex = np.random.randint(circler, cols - 2 * circler)
circley = np.random.randint(circler, rows - 2 * circler)
cv2.circle(camimg, (circlex, circley), circler, (0, 0, 255), -1)
dist =
(playerx - circlex) ** 2 + (playery - circley) ** 2
if dist <
(2 * circler) ** 2:
hit = True
else:
hit = False
cv2.imshow('OpenCV Game', camimg)
key =
cv2.waitKey(1) & 0xFF
if key ==
0x1B:
break
if key ==
ord(' '):
cv2.imwrite('game.jpg', camimg)
cv2.destroyAllWindows()
if __name__ == '__main__':
main()
 marker.jpg
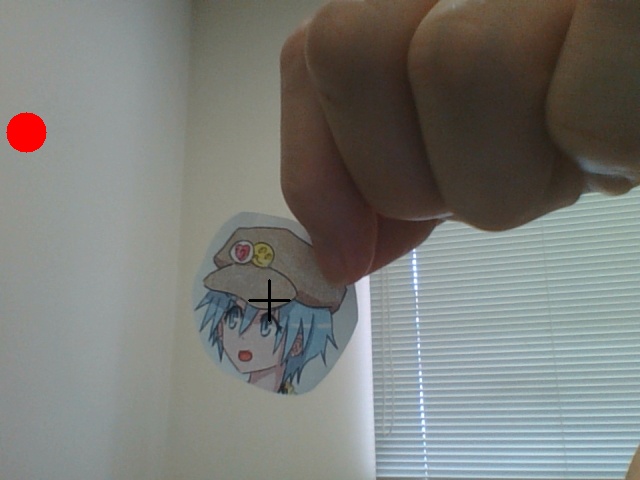
Tracking version of above program.
# -*- coding: utf-8 -*-
import numpy as np
import cv2
def main():
circler = 20
hit = True
tracker = cv2.TrackerKCF_create()
capture = cv2.VideoCapture(0)
while True:
_, camimg = capture.read()
camimg = cv2.flip(camimg, 1)
rows, cols, _ = camimg.shape
x, y = int(cols / 2) - 50, int(rows / 2) - 50
w, h = 100, 100
cv2.rectangle(camimg, (x - 2, y - 2), (x + w + 2, y + h + 2), (0, 0, 255), 2)
message = 'Put object inside and press space'
cv2.putText(camimg, message, (50, 50), cv2.FONT_HERSHEY_SIMPLEX, 1, (0, 0, 0), 2)
cv2.imshow('OpenCV Game', camimg)
key = cv2.waitKey(1) &
0xFF
if key == ord(' '):
tracker.init(camimg, (x, y, w, h))
break
if key == ord('s'):
cv2.imwrite('game1.jpg', camimg)
while True:
_, camimg = capture.read()
camimg = cv2.flip(camimg, 1)
_, (x, y, w, h) = tracker.update(camimg)
playerx = int(x + w / 2)
playery = int(y + h / 2)
cv2.line(camimg, (playerx - circler, playery), (playerx + circler, playery), (0, 0, 0), 2)
cv2.line(camimg, (playerx, playery - circler), (playerx, playery + circler), (0, 0, 0), 2)
if hit:
circlex = np.random.randint(circler, cols - 2 * circler)
circley = np.random.randint(circler, rows - 2 * circler)
cv2.circle(camimg, (circlex, circley), circler, (0, 0, 255), -1)
dist = (playerx - circlex) ** 2 + (playery - circley) ** 2
if dist < (2 * circler)
** 2:
hit = True
else:
hit = False
cv2.imshow('OpenCV Game', camimg)
key = cv2.waitKey(1) &
0xFF
if key == 0x1B:
break
if key == ord('s'):
cv2.imwrite('game2.jpg', camimg)
capture.release()
cv2.destroyAllWindows()
if __name__ == '__main__':
main()
![]()
![]()
Create your own interactive game program freely using the above information and the web information. You can use Tensorflow, Tkinter, or OpenGL if you like in addition to OpenCV.
[For your information] Naemura lab.
https://nae-lab.org/lecture/OpenCV+OpenGL/